How to Grow Microgreens: Quick and Easy Guide
Introduction
Microgreens have taken the gardening and culinary worlds by storm for good reason. These tiny, nutrient-dense greens, sometimes referred to as "vegetable confetti," are not only packed with vitamins and minerals but are also relatively easy to grow at home. Their vibrant colors and intense flavors make them a popular choice among chefs, and their simplicity and quick growth make them a favorite among gardeners, both novice and experienced.
One of the most appealing aspects of growing microgreens is that they can be cultivated indoors with minimal space and resources. All you need are basic supplies like trays, a suitable growing medium, some seeds, and a little bit of sunlight or artificial light. In just 7-21 days, you can go from planting to harvesting a fresh batch of these mini greens, making them an exceptionally fast and rewarding crop to grow.
Microgreens offer a host of health benefits. They are rich in vitamins, minerals, and antioxidants, enhancing both the nutritional value and flavor of your meals. From salads and sandwiches to smoothies and garnishes, their culinary uses are virtually limitless. This blog post will guide you through the entire process of growing microgreens, covering everything from choosing the right variety to the tools you'll need and the optimal growing conditions.
Whether you’re a seasoned gardener or just starting, microgreens are an excellent choice due to their variety and versatility. Popular options include broccoli, radish, and sunflower microgreens. Additionally, it's essential to use organic and non-GMO seeds to ensure the healthiest and most sustainable greens possible. Selecting the appropriate trays, soil, and indoor lighting is also crucial for successful growth.
In the sections to follow, we'll delve into each step, offering tips on how to prepare your growing medium, scatter seeds evenly, and maintain the right balance of light, temperature, and airflow. We’ll also cover harvesting techniques and best practices for storing your microgreens to keep them fresh. By the end of this guide, you'll be fully equipped with everything you need to grow your own microgreens and enjoy their myriad benefits.
Why Grow Microgreens?
Microgreens have been gaining popularity among both gardeners and chefs, and for good reason. They pack a significant nutrient punch, offering a high concentration of vitamins, minerals, and antioxidants in a tiny package. Often referred to as "vegetable confetti," these tiny greens are not just visually appealing but are also incredibly nutrient-dense. Because they can be grown easily at home, they have become a go-to for those looking to boost their diet with nutrient-loaded greens without much hassle.
Growing microgreens requires minimal space and resources, making them perfect for indoor cultivation. You do not need a large garden or extensive equipment; a simple tray, soil, and some seeds are enough to get started. Their rapid growth cycle, with harvest times ranging from just 7 to 21 days, means you can enjoy fresh greens quickly. This easy and fast growing process makes them ideal even for people who are new to gardening or have limited space, such as apartment dwellers.
The health benefits and culinary versatility of microgreens further add to their appeal. Rich in essential vitamins such as C, E, and K, as well as various minerals, incorporating these greens into your meals can enhance both flavor and nutritional value. They make wonderful additions to salads, sandwiches, smoothies, and as garnishes, elevating the taste and presentation of any dish. According to research from the University of Maryland, some microgreens have nutrient levels that are up to 40 times higher than mature leaves of the same plants.
For both novice and experienced gardeners, microgreens offer a simple yet rewarding gardening experience. Their swift growth, minimal need for care, and highly nutritious yield make them an excellent choice to experiment with. Whether you are a beginner looking for an easy start or a seasoned gardener seeking a new challenge, microgreens provide a versatile and enriching gardening project. With just a bit of care, you can achieve a bountiful and healthy harvest right from your own home.
Choosing Your Microgreens
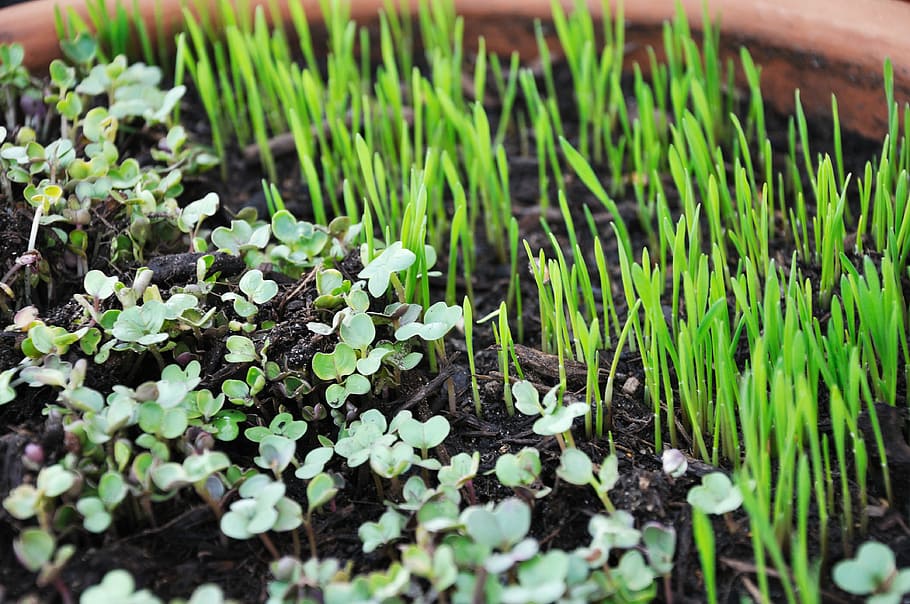
To begin, selecting the right type of microgreens is crucial to your gardening success. Common varieties include broccoli, radish, and sunflower, but there are numerous other options such as arugula, cilantro, and mustard greens. Each type offers unique flavors and textures, which can enhance a wide range of dishes. For novices, starting with quick-growing and hardy varieties like radish or sunflower can be particularly rewarding and less intimidating.
When choosing seeds, opt for organic and non-GMO options to ensure they are free from harmful chemicals and genetically modified organisms. Many reputable seed suppliers offer microgreen-specific seeds, which are tested for higher germination rates. According to a study by the University of Maryland, microgreens contain higher nutrient levels when grown from organic seeds, making them a healthier choice for you and your family.
The growing medium you select also plays a significant role in the health and growth of your microgreens. While soil is the most traditional choice, other mediums like coco coir and hydroponic mats are gaining popularity due to their ease of use and efficiency. Coco coir, for instance, offers excellent water retention and is environmentally friendly. Hydroponic mats can simplify the cleaning process, reducing the risk of soil-borne diseases.
Finally, invest in appropriate trays and indoor lighting to create an ideal growing environment. Standard seed trays or shallow planters can work well, as long as they have drainage holes to prevent waterlogging. Adequate lighting is essential, especially if you are growing microgreens indoors. Natural sunlight is excellent, but if that is limited, consider using grow lights. A study by Purdue University suggests that microgreens grown under LED grow lights can achieve optimal growth and nutritional content.
Essential Supplies
To effectively grow microgreens, you'll need a few essential supplies. First, ensure you have suitable trays—black bottom trays with drainage holes work best for air circulation and root health. Opt for shallow trays which facilitate better water management and are easier to handle. The growing medium is equally crucial; you can choose between soil, coco coir, and hydroponic mats. Soil is a popular choice as it is nutrient-dense and supports robust growth, whereas coco coir is known for its excellent water retention and aeration properties. Hydroponic mats offer a soilless alternative, making clean-up easier for home gardeners.
Additionally, a spray bottle is indispensable for watering your microgreens without disturbing the seeds or the delicate shoots. Maintaining humidity and preventing overwatering are both crucial, as excessive moisture can invite mold and pests. Organic and non-GMO seeds are highly recommended to ensure you are cultivating the healthiest and most potent microgreens. Reliable seeds produce consistent results and nutrient-rich microgreens, whether you prefer broccoli, radish, or sunflower varieties.
Lastly, proper lighting is vital for the effective growth of microgreens. Natural sunlight is ideal, but if that's limited, LED grow lights provide a viable alternative. They ensure that your microgreens receive light for 12-16 hours a day, which is essential for photosynthesis and greening. Position lights about a few inches above the trays and adjust as the plants grow. Ensuring these basic supplies are in place will set you up for a successful and bountiful microgreens harvest.
Preparing Your Growing Medium
For optimal growth of your microgreens, selecting and preparing your growing medium is crucial. You have several options, including soil, coco coir, and hydroponic mats. Organic potting soil is a popular choice because it’s rich in nutrients, providing a solid foundation for young microgreen roots. Coco coir, which is made from coconut husks, holds moisture well and is biodegradable, making it an eco-friendly alternative. Hydroponic mats, although more specialized, support soilless growth and are ideal for achieving clean, efficient results. Ensure whichever medium you choose is free from contaminants and pesticides to maintain the purity of your microgreens.
Once you have your medium, evenly distribute it in your growing tray, creating a smooth and level surface. This promotes uniform seed germination and growth. After spreading the medium, water it lightly until it’s damp but not soggy. This moisture level is essential for seeds to sprout effectively. Make sure there’s adequate drainage to prevent waterlogging, which can lead to mold growth. By carefully preparing your growing medium, you set the stage for healthy, vigorous microgreens that you can enjoy in just a few weeks.
Sowing the Seeds
To start sowing the seeds, first prepare the growing medium, whether it's soil, coco coir, or hydroponic mats. Make sure the medium is moist but not waterlogged; this ensures good seed-to-soil contact and prevents seeds from drying out. Gardner and microgreen specialist Peter Burke emphasizes, “The key to lush microgreens is a well-moistened, nutrient-rich medium.”
Next, scatter the seeds evenly over the prepared medium. Aim for good coverage without overcrowding, as this promotes healthy growth and minimizes competition for resources. For instance, if you're using broccoli seeds, evenly distribute them across the surface to prevent clumping and ensure uniform growth.
After scattering, gently press the seeds into the medium or lightly cover them with a thin layer of soil. This helps secure the seeds and enhances moisture retention. Expert growers recommend using a flat piece of cardboard to gently press the seeds in, ensuring they make consistent contact with the medium.
Keep an eye on light, temperature, and airflow, which are crucial for germination. Place the trays in a spot with ample indirect sunlight or use grow lights, ensuring 12-16 hours of light daily. Maintain a temperature of around 70°F. Proper airflow can prevent mold and keep the environment healthy for seedlings.
Finally, water the seeds using a fine mist spray bottle. Watering should be thorough but gentle to avoid displacing seeds. Mist the medium lightly enough to keep it moist but not drenched, which helps prevent mold growth, essential for a successful microgreen crop.
Ideal Growing Conditions
To successfully grow microgreens, you need to create the ideal growing environment for them. These tiny plants thrive in temperatures ranging from 60°F to 75°F, providing them with an environment similar to spring and early summer conditions. Maintaining such temperatures ensures that the microgreens grow rapidly and remain healthy. Consistent airflow is also crucial for preventing mold; using a small fan can help to keep the air circulating around your plants and reduce humidity levels, which are ideal breeding grounds for fungal growth.
Light plays a pivotal role in the development of microgreens. While natural sunlight is preferable, placing your trays by a sunny window might not always be feasible. Grow lights, like fluorescent or LED lights, mimic the natural light conditions that microgreens require, ensuring they photosynthesize efficiently and develop rich, vibrant colors. Position these lights about 12 inches above the plants, and leave them on for 12-16 hours each day to simulate a full day of sun exposure.
Proper watering is another essential component of growing healthy microgreens. It is recommended to use a spray bottle to mist the seeds and growing medium lightly, ensuring consistent moisture without overwatering, which can lead to mold. Water from the bottom by placing your trays in a shallow water-filled container, allowing the medium to absorb moisture through the drainage holes. This technique provides adequate hydration while keeping the foliage dry, further preventing mold and promoting robust growth.
Watering Microgreens Properly
Proper watering is crucial for growing healthy microgreens. Aim to keep the growing medium consistently moist but not waterlogged, as too much water can lead to mold growth. Using a fine mist spray bottle is ideal for the delicate young plants, ensuring even moisture distribution without disturbing the seeds.
Experts recommend watering microgreens twice a day, once in the morning and once in the evening. This routine helps maintain optimal moisture levels. However, monitor your specific growing conditions, as factors like ambient humidity and temperature can affect your watering needs.
Fan usage can significantly improve airflow around your microgreens, preventing mold and encouraging healthy growth. Adequate ventilation helps to dry out any excess moisture and keeps the plants robust.
In addition to surface watering, bottom watering is an effective technique. Placing the tray in a shallow container of water allows the medium to absorb moisture from below, reducing the risk of overwatering the surface and potentially disturbing the seedlings.
Lastly, ensure your water is free from contaminants. Using filtered or distilled water can prevent potential chemical residue build-up, which can harm your microgreens and stunt their growth.
Managing Light Exposure
Proper light exposure is crucial for the healthy growth of microgreens. For optimal results, position your microgreens near a sunny window that receives at least four to six hours of direct sunlight daily. If natural light is insufficient, consider investing in grow lights, which provide a consistent light source essential for robust growth. Fluorescent or LED lights, positioned about 12 inches above the plants, can simulate the required sunlight.
Adjusting the light exposure as your microgreens grow is also important. Initially, your seedlings should have some shade to encourage strong rooting. Gradually increase the light intensity as the plants mature to enhance their greening and nutrient content. Overexposure, though, may result in scorched leaves.
Using a timer for grow lights ensures microgreens receive consistent light and rest periods, typically 16 hours of light followed by 8 hours of darkness. This mimics natural daylight cycles and promotes balanced growth. Balanced light exposure helps in developing vibrant, flavorful, and nutrient-dense microgreens.
Continuous monitoring can prevent issues like leggy or weak plants, which are often caused by inadequate light. If your microgreens appear pale or stretched, they likely need more light. Consistent observation and adjustment help maintain their health and quality.
Thinning and Spacing Tips
Proper thinning is crucial for ensuring your microgreens have enough room to grow. Overcrowding can stifle growth and lead to poor airflow, which invites mold. For best results, gently use small scissors to trim and thin out the seedlings. Aim to leave roughly half an inch between the remaining plants.
Spacing is another key factor. When sowing seeds, it's vital to scatter them evenly across the growing medium. Press seeds lightly into the surface to ensure good contact with the soil, which promotes uniform growth. Avoid layering seeds too densely as this can overshadow some and hinder their access to nutrients and light.
By maintaining proper spacing, each microgreen gets adequate light exposure, critical for healthy and lush growth. Utilizing grow lights or natural sunlight, ensure an even distribution of light. Regularly rotate trays if relying on natural light to prevent seedlings from leaning and stretching.
An evenly spaced crop not only looks appealing but is also easier to manage and harvest. Proper spacing helps in preventing dampness and mold, and ensures robust, flavorful microgreens. Healthy growth enhances the overall yield and quality, justifying the effort put into proper thinning and spacing.
Harvesting Your Microgreens
Timing your harvest is essential; most microgreens are ready to be picked within 7-21 days, typically when their first true leaves have emerged. Cutting them too early or too late can impact flavor and nutritional content. The tools you need for harvesting include clean, sharp scissors or a knife to ensure a smooth cut and to minimize damage to the plants.
For the freshest taste and best texture, it's recommended to harvest in the morning when the microgreens are most hydrated. This practice helps in retaining their crispness. Gently cut the microgreens just above the soil line to avoid introducing any debris into your harvest.
After cutting, it's vital to keep your microgreens fresh. Place them in a container lined with a damp paper towel and store them in the refrigerator. These steps will help maintain their quality and extend shelf life up to a week.
Proper storage is crucial; use airtight containers to prevent the loss of moisture and exposure to surrounding air, which can lead to wilting. This method helps you enjoy your fresh microgreens at their peak for as long as possible.
Storing Fresh Microgreens
To keep harvested microgreens fresh, store them in an airtight container lined with a damp paper towel to maintain humidity. Place the container in the refrigerator, ideally in the crisper drawer where the temperature and humidity are controlled. This method helps prolong their freshness for up to a week.
Avoid washing microgreens before storage, as moisture can accelerate spoilage. Instead, rinse them right before use. For optimal results, consider using a salad spinner to dry them thoroughly after rinsing to prevent wilting. Managing moisture levels carefully will ensure your microgreens remain crisp and vibrant.
Common Growing Issues
Microgreens can sometimes suffer from mold, primarily due to overwatering or poor air circulation. To counteract this, ensure proper ventilation and water cautiously, providing just enough moisture to prevent the medium from drying out. A small fan can enhance airflow around the plants, reducing the risk of mold growth.
Pests like aphids and spider mites can also be problematic, especially in indoor environments. Regularly inspect your plants for signs of infestation, such as tiny insects or discolored leaves. Use organic insecticidal soap or neem oil to treat affected areas without harming your microgreens.
Lighting issues can lead to leggy, weak plants. Ensure your microgreens receive adequate light, ideally from a south-facing window or grow lights positioned about 6 inches above the plants. Adjust the distance as the microgreens grow to maintain consistent light exposure, which is crucial for sturdy and vibrant growth.
Benefits of Microgreens
Microgreens are rich in essential nutrients such as vitamins, minerals, and antioxidants, providing a nutritional boost to your diet. According to a study published in the Journal of Agricultural and Food Chemistry, microgreens can contain up to 40 times more nutrients than their mature counterparts. Chefs and home cooks alike cherish microgreens for their ability to enhance the flavor, texture, and visual appeal of various dishes. They add a fresh, vibrant touch to salads, sandwiches, smoothies, and garnishes, making them a versatile ingredient in the kitchen.
For instance, a sprinkle of radish microgreens can add a zesty kick to a simple avocado toast. Using microgreens in daily meals is straightforward; they are easy to incorporate into salads, sandwiches, smoothies, and as garnishes for a burst of flavor and nutrition. Keeping harvested microgreens fresh involves proper handling and storage practices; they should be refrigerated in airtight containers to maintain their crispness and nutritional value.
There are common concerns about the safety and shelf life of microgreens, but with proper techniques, these issues can be managed effectively. For beginners, it is essential to start with high-quality, organic, and non-GMO seeds and follow appropriate growing and storage methods.
Microgreens in Culinary Uses
Microgreens, rich in vitamins, minerals, and antioxidants, significantly enhance your culinary creations with their vibrant flavors and crunchy textures. Renowned chefs like Dan Barber use microgreens to elevate dishes, adding an explosion of color and fresh taste that transforms salads and sandwiches into gourmet experiences. Their versatility makes them a perfect garnish or a healthy boost to daily meals, including smoothies and soups.
Popular microgreens such as radish and sunflower not only improve taste but also offer remarkable health benefits. Cooking experts, like Alice Waters, emphasize their importance in adding depth and nutritional value to simple dishes. Just a handful can drastically improve the visual appeal and flavor profile of your plate, making them a favorite among home cooks and professional chefs alike.
To maximize the freshness and nutrients, handling and storage are crucial. Microgreens should be dried thoroughly and stored in breathable containers to maintain their quality. Chefs often prefer to consume freshly harvested microgreens within a week, ensuring the highest nutritional content and flavor. Properly managing these tiny greens avoids common pitfalls, allowing you to enjoy their rich benefits to the fullest.
Frequently Asked Questions
People often wonder how to determine if microgreens are ready for harvest, and the general rule of thumb is when they've developed their first set of true leaves, typically within 7-21 days depending on the type. Harvesting is best done using sharp scissors or a knife early in the morning when the greens are crisp and full of moisture. As for shelf life, microgreens can be stored in the refrigerator for up to a week; however, it's important to ensure they are dry before storage to prevent mold. Always use breathable containers or perforated plastic bags to aid in air circulation.
Another frequently asked question deals with light and growing conditions. While natural sunlight is ideal, grow lights can effectively supplement light needs if natural sunlight is insufficient, especially during winter months. Make sure to provide 12-16 hours of light daily for optimal growth. If you face issues like mold, ensure adequate airflow around your growing trays and avoid overwatering. Using a small fan can help maintain air circulation. Employing organic fungicides like neem oil and maintaining cleanliness in your growing area can also prevent and manage pest issues effectively.
Conclusion
Growing microgreens offers an enriching and straightforward hobby for gardeners at all skill levels. Their quick turnaround and vast health benefits make them a rewarding endeavor. Plus, the minimal space and resources required mean that even urban gardeners can enjoy fresh, nutrient-dense greens year-round.
Whether you're a novice or an experienced gardener, microgreens present a versatile addition to your gardening repertoire. They elevate the flavor, texture, and visual appeal of various dishes effortlessly. From selecting the right seeds to optimal growing techniques, every step contributes to a bountiful harvest.
These tiny greens pack a significant nutritional punch, loaded with vitamins, minerals, and antioxidants. Their simplicity in cultivation, coupled with their culinary versatility, underscores why they are increasingly favored by both gardeners and chefs.
With practical storage solutions and organic problem-solving tips, keeping your microgreens fresh and healthy becomes easy. Adopting microgreens into your routine doesn't just add value to your meals—it enriches your overall well-being.
Dive into the world of microgreens and enjoy the tangible rewards of your effort. Happy gardening!
Meta Description: Learn how to grow microgreens at home with our comprehensive and easy guide. From choosing seeds to harvesting, we've got you covered!
Meta Keywords: how to grow microgreens, microgreens, growing microgreens, microgreens guide, microgreen supplies, microgreen benefits, home gardening
Sources:
https://www.thespruce.com
https://www.gardeningknowhow.com
Microgreen Garden: Indoor Grower's Guide to Gourmet Greens by Mark Mathew Braunstein
Indoor Kitchen Gardening: Turn Your Home Into a Year-round Vegetable Garden by Elizabeth Millard
https://www.seedleaf.com